Create Your First Order via the e-Courier API
Follow this tutorial to learn how to connect to and post an order through the e-Courier API.
- Before creating an order with the e-Courier API you must ensure the e-Courier customer has their API endpoints enabled, and you must have either a username and password or an authentication token commonly called a UserGUID (User Global Unique Identified)
- You must also have the e-Courier customer’s base URL, for example: https://post.example.e-courier.com
- You must know what Customer Code the e-Courier customer has designated for orders you create via API.
The following documents should be posted as an HTTP Post message to the following endpoints:
For SOAP Documents:
http://post.example.e-courier.com/example/software/xml/xml.asp
For JSON Documents:
http://post.example.e-courier.com/example/software/xml/ecJsonPost.asmx/SaveOrder
In both cases substitute your actual base URL for the example base URL (http://post.example.e-courier.com/example).
The e-Courier endpoint uses a custom HTTP Header called UserGUID to specify an access token. This can be specified in Postman under the “Headers” tab as shown below:
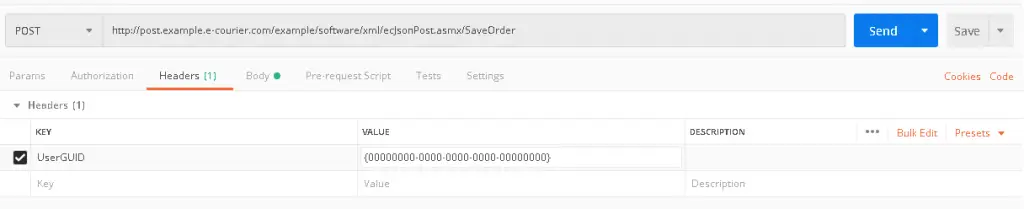
With the UserGUID specified on the “Headers” tab, you’re ready to go the Body tab and enter the content of the post.

{
“Order”: {
“CustomerCode”: “Alpha”,
“Service”: “Route”,
“Auth”: “1234779”,
“Pieces”: {
“Piece”: {
“Sequence”: “1”,
“Reference”: “test1234barcode”,
“Pieces”: “1”
}
},
“Stops”: {
“Stop”: {
“Sequence”: “1”,
“StopType”: “P”,
“ScheduledDateTime”: “11/13/2019 6:00:00 AM”,
“Name”: “James Madison”,
“Address”: “2251 Orange Blossom Trail”,
“City”: “Orlando”,
“State”: “FL”,
“Zip”: “32804”,
“Country”: “USA”,
“Phone”: “3015551212”,
“ScheduledDateTimeTZ”: “EST”,
“OrderStopPieces”: {
“OrderStopPiece”: {
“PieceAction”: “P”,
“Sequence”: “1”
}
}
},
“Stop”: {
“Sequence”: “2”,
“StopType”: “D”,
“ScheduledDateTime”: “11/13/2019 5:00:00 PM”,
“Name”: “Bryan Moore”,
“Address”: “2253 Orange Blossom Trail”,
“City”: “Orlando”,
“State”: “FL”,
“Zip”: “32804”,
“Country”: “USA”,
“Phone”: “3015551212”,
“ScheduledDateTimeTZ”: “EST”,
“OrderStopPieces”: {
“OrderStopPiece”: {
“PieceAction”: “D”,
“Sequence”: “1”
}
}
}
}
}
}
<SOAP:Envelope xmlns:SOAP=’http://schemas.xmlsoap.org/soap/envelope/’ >
<SOAP:Body UserGUID = ‘{redacted}’ >
<m:SaveOrder xmlns:m =’http://ecouriercom.wpenginepowered.com/schemas/’ >
<Order Notes = ‘Pick up from UPS between 10 am- 1 pm’ Service = ‘Regular’ CustomerCode = ‘4’ Caller = ” >
<Stops >
<Stop Sequence = ‘1’ StopType = ‘P’ Note = ” Name = ‘UPS’ Address= ‘16000 Arminta St’ City = ‘Van Nuys’ State = ‘CA’ Zip = ‘91406’ Phone = ” EarlyDateTime = ” ScheduledDateTime = ’10/22/2020 10:00 am’ LateDateTime =” >
<OrderStopPieces >
<OrderStopPiece Sequence = ‘1’ PieceAction = ‘P’/>
</OrderStopPieces >
</Stop >
<Stop Sequence = ‘2’ StopType = ‘D’ Note = ” Name = ‘JEHAN HULEISY’ Address = ‘15472 BOSE STREET’ City = ‘VAN NUYS’ State= ‘CA’ Zip = ‘91406’ Phone = ‘18003600520’ EarlyDateTime = ” ScheduledDateTime = ’10/22/2020 10:30 am’ LateDateTime = ” >
<OrderStopPieces >
<OrderStopPiece Sequence = ‘1’ PieceAction = ‘D’ />
</OrderStopPieces >
</Stop >
</Stops >
<Jobs >
<Job Sequence = ‘1’ />
</Jobs>
<Pieces >
<Piece Sequence = ‘1’ Pieces = ‘1’ Weight = ” Description = ” ContainerReference = ” Reference =’1Z0R544VNW28497956′ />
</Pieces >
</Order >
</m:SaveOrder >
</SOAP:Body >
</SOAP:Envelope >
When the UserGUID HTTP header is set and the Body of the post is set with a properly formatted JSON or SOAP XML document, then the order is ready to be submitted. When you click the ‘Send’ button you should receive a response stating the request was received. If you receive an error message, check the API Reference page for information regarding error statuses.
